PHP (HYPERTEXT PREPROCESSOR)History: PHP was created by Rasmus Lerdorf in 1994 as a set of Common Gateway Interface (CGI) binaries written in the C programming language. It was initially designed for simple web tasks, like tracking visits to his online resume. Over time, it evolved into a full-fledged scripting language.
PHP, as a programming language, has been widely used for web development for many years. However, when comparing PHP directly to Laravel (a PHP web application framework), there are some limitations and disadvantages of using plain PHP in certain contexts. Here are some of the disadvantages of PHP when compared to Laravel:
-
Lack of Structure: PHP doesn't enforce a specific application structure or coding style. Without a framework like Laravel, developers need to create their own architecture, which can lead to inconsistent code and reduced maintainability in larger projects.
-
Boilerplate Code: PHP applications often require writing repetitive code for common tasks like routing, database operations, and form validation. Laravel abstracts these tasks, reducing the need for boilerplate code.
-
Limited Built-in Features: PHP itself lacks built-in features for common web development tasks such as authentication, routing, and database abstraction. Laravel provides these features out of the box, saving development time.
-
Security Concerns: PHP code can be vulnerable to security issues like SQL injection and cross-site scripting (XSS) if not implemented correctly. Laravel includes security features like CSRF protection and prepared statements to mitigate these risks.
-
Testing Challenges: Writing unit and integration tests in plain PHP can be more challenging and time-consuming compared to using a framework like Laravel, which has built-in support for testing.
-
Lack of Convention: PHP projects often lack a standardized naming convention and coding style. Laravel enforces coding conventions and follows best practices, improving code consistency.
-
Difficulty in Scaling: As PHP projects grow, managing dependencies and ensuring scalability can become complex. Laravel simplifies dependency management and provides tools for scaling applications.
-
Learning Curve: While PHP is relatively easy for beginners to pick up, Laravel may have a steeper learning curve due to its additional features and abstractions. However, this disadvantage diminishes with experience.
-
Community Support: While PHP has a large and active community, Laravel's community is more specialized in web development. Laravel users can access dedicated resources and support for web development-related issues.
-
Limited Ecosystem: PHP has a broad ecosystem, but for specific web development needs, developers often rely on third-party libraries and tools. Laravel offers a more cohesive ecosystem tailored for web development.
In summary, while PHP is a versatile and widely used scripting language, using it without a framework like Laravel can lead to challenges in terms of code structure, security, and development speed, especially for complex web applications. Laravel addresses many of these issues by providing a structured and feature-rich environment for PHP web development.
LARAVELHistory: Laravel was created by Taylor Otwell and first released in 2011. Otwell built Laravel to address common pain points in PHP web development, aiming to make web development more efficient, expressive, and enjoyable. Laravel quickly gained popularity due to its elegant syntax and robust features.
Laravel was created to address common challenges and limitations in PHP web development. It is not meant to be seen as "better than PHP" but rather as a framework built on top of PHP to simplify and enhance web development. Here are the reasons why Laravel was created and its advantages:
1. Developer Productivity:
- Laravel was designed to improve developer productivity. It offers an elegant and expressive syntax, reducing the amount of boilerplate code needed in PHP web applications.
- Advantages: Developers can build complex web applications more quickly and efficiently. Laravel's concise code encourages best practices and maintainability.
2. MVC Architecture:
- Laravel enforces the Model-View-Controller (MVC) architectural pattern, separating concerns and making applications more organized and maintainable.
- Advantages: This separation of concerns improves code readability and allows for easier testing, debugging, and scaling of web applications.
3. Eloquent ORM:
- Laravel introduced the Eloquent ORM, a powerful database abstraction layer that simplifies database operations.
- Advantages: Developers can work with databases using intuitive object-oriented syntax, reducing the need for complex SQL queries. Eloquent supports relationships, making it easier to handle database interactions.
4. Blade Templating Engine:
- Laravel includes the Blade templating engine, which streamlines the creation of dynamic views.
- Advantages: Blade templates are easy to write and read, allowing developers to create dynamic content without mixing PHP with HTML. This separation enhances maintainability and front-end development.
5. Comprehensive Ecosystem:
- Laravel's creator, Taylor Otwell, wanted to provide a complete and cohesive framework for web development.
- Advantages: Laravel offers a rich ecosystem of packages and tools, simplifying tasks such as authentication, routing, and testing. This ecosystem accelerates development and ensures consistency.
6. Built-in Features:
- Laravel includes many built-in features like authentication, middleware, routing, and Artisan CLI to reduce the need for third-party libraries and tools.
- Advantages: Developers can leverage these features out of the box, saving time and ensuring security and reliability in their applications.
7. Active Community:
- Laravel's creator fostered a vibrant and supportive community around the framework.
- Advantages: The Laravel community provides extensive documentation, tutorials, and packages, offering help and resources to developers. This support enhances the learning curve and troubleshooting process.
In conclusion, Laravel was created to enhance and streamline PHP web development. It provides a structured, expressive, and efficient environment for building web applications. While it's not accurate to say that Laravel is "better than PHP" (as Laravel is built on PHP), it significantly improves the developer experience and allows developers to create high-quality web applications more easily.
SQL (STRUCTURED QUERY LANGUAGE)History: SQL (Structured Query Language) originated in the 1970s as a standardized way to interact with relational databases. Over time, it evolved through standards like SQL-86 and SQL-92, adapting to internet and e-commerce growth in the 1990s. Subsequent versions added advanced features. While NoSQL databases emerged in the 2000s, SQL remains a fundamental tool in data management, continuously evolving to support modern data needs, including big data and cloud computing.
SQL (Structured Query Language) is a domain-specific language used for managing and manipulating relational databases. It serves as a standard interface for communicating with and managing relational database systems like MySQL, PostgreSQL, SQLite, SQL Server, and others. SQL allows users to perform various operations on a database, including creating and modifying tables, inserting, updating, and deleting data, and querying data for analysis or retrieval.
SQL Implementation in Laravel:
Laravel is a popular PHP web application framework that provides built-in support for database interactions using SQL. Laravel uses the Eloquent ORM (Object-Relational Mapping) and the Query Builder to simplify database operations. Here's how SQL is implemented in Laravel:
-
Database Configuration: In a Laravel project, we first configure our database connection in the
config/database.phpfile. we specify the database driver (e.g., MySQL), host, username, password, and database name. -
Migration: Laravel provides a migration system to create and modify database tables using PHP code. Migrations are like version control for our database schema. we define the structure of our database tables using Laravel's schema builder, and then we can run migrations to create or modify tables.
-
Eloquent ORM: Laravel's Eloquent ORM allows we to work with database records as objects. we create a model class for each database table, and Laravel handles SQL queries behind the scenes. Eloquent makes it easy to retrieve, insert, update, and delete records without writing raw SQL queries.
-
Query Builder: Laravel also provides a query builder that allows we to write database queries using a fluent, object-oriented syntax. This is helpful when we need to construct more complex queries or perform operations that are not easily achievable with Eloquent.
-
Raw SQL Queries: While Laravel encourages the use of Eloquent and the query builder, we can still execute raw SQL queries when needed using the
DBfacade. This allows we to leverage the full power of SQL when required.
MySQL:
MySQL is one of the most popular open-source relational database management systems (RDBMS). It is widely used in web development projects, including Laravel applications. MySQL uses SQL as its query language, and it stores data in tables with defined relationships.
Here are some key aspects of MySQL:
-
Database Management: MySQL allows we to create and manage databases, tables, and indexes to store and organize our data efficiently.
-
Data Manipulation: we can use SQL commands to insert, update, delete, and retrieve data from MySQL databases.
-
Data Types: MySQL supports various data types such as integers, floats, strings, dates, and more, allowing we to store and retrieve different kinds of data.
-
Transactions: MySQL supports transactions, ensuring data consistency and integrity in multi-step operations.
-
Security: MySQL offers user authentication and authorization mechanisms to secure access to the database.
-
Performance Optimization: MySQL provides features like indexing, caching, and query optimization to improve the performance of database operations.
In Our project, since We used MySQL, we created and interacted with MySQL databases using SQL queries and integrated them into our Laravel application using Laravel's database features like Eloquent and the Query Builder. This combination of Laravel and MySQL allows us to efficiently manage and retrieve data for our application.
INSTALLATION OF LARAVELFor Windows
Installing XAMPP and Composer for PHP on our system is a common setup for local web development environments. Let's break down the process step by step,
Step 1: Download and Install XAMPP (WINDOWS)
-
Visit the official XAMPP website (https://www.apachefriends.org/index.html) and download the XAMPP installer suitable for our operating system (
Windows). -
Run the
XAMPPinstaller and follow the installation instructions. During installation:-
Choose the components we want to install. Typically, we'd select
ApacheandMySQL, which are included in XAMPP. -
XAMPPoften includesPHP by default. It's essential to check that PHP is included in our XAMPP installation during the installation process.
-
-
After the installation is complete,
launch the XAMPPControl Panel. -
Start both the Apache and MySQL services from the control panel. Wait for them to turn
green, indicating that they are running successfully. -
Open a command prompt or terminal window and type
php -vto check if PHP is working correctly. we should see the PHP version displayed, e.g.,PHP 8.2.0.
Step 2: Install Composer
-
Composeris a PHP dependency manager that helpsmanage PHP frameworks and packages. -
Visit the official Composer website (https://getcomposer.org/) and follow the installation instructions for our operating system. Composer provides an installer script that we can run to install Composer globally on our system.
-
To verify that Composer is successfully installed, open a new command prompt or terminal window and type
composer. we should see the Composer logo and version information displayed.
Step 3: Register Composer in System Path
It's essential to ensure that the path to Composer is registered on our system so that we can use it from any directory.
-
Search for
"Environment Variables"on our computer and click "Edit the system environment variables." -
In the System Properties panel, click the
"Environment Variables"button. -
Under "User variables" (for our user profile), find the "Path" variable and click
"Edit." -
Add the path to the
binfolder of Composer (e.g.,C:\ProgramData\ComposerSetup\bin) to our user's PATH variable. -
In the "System variables" section, find the "Path" variable and click
"Edit." -
Add the paths to the XAMPP PHP installation (e.g.,
C:\xampp\php) and any other necessary entries for our development environment. -
Restartour computer to ensure that the changes to the PATH variable take effect.
Step 4: Verify Composer Installation
After restarting our system, open a command prompt or terminal window and run the composer command again. This time, Composer should work from any directory without any issues.
By following these steps, we have successfully set up XAMPP, which includes PHP, and Composer on our system. XAMPP provides a complete local development environment with Apache, MySQL, and PHP, so there's no need to separately install PHP 8.x if it's already included in our XAMPP installation. This setup allows we to develop and test PHP-based web applications locally with ease.
For Linux(Ubantu)
Installing the LAMP stack on Ubuntu and provide some additional points to check whether the commands worked properly or not.
Installing Apache:
-
Update Package Lists:
sudo apt update: This command updates the package lists for upgrades, ensuring that we install the most up-to-date versions of the software later.
Check: After running this command, ensure that it completes without errors. It should list packages that have been updated.
-
Install Apache:
sudo apt install apache2: Installs the Apache web server.
Check: When prompted, press 'Y' to confirm the installation. The installation should proceed without errors.
-
Allow Apache Through Firewall:
sudo ufw allow in "Apache Full": This command allows incoming connections on ports 80 (HTTP) and 443 (HTTPS) for Apache.
Check: After running this command, we can use
sudo ufw statusto verify that the firewall rule for Apache Full is active. It should show as "Status: active" with the Apache Full rule listed. -
Access Apache Default Page:
- After completing the above steps, we can open a web browser and enter our server's IP address. we should see the default Apache web page, indicating that Apache is working correctly.
Check: Open a web browser, enter the server's IP address, and check if the Apache default page is displayed.
Installing MySQL:
-
Install MySQL:
sudo apt install mysql-server: Installs the MySQL database server.
Check: During installation, we'll be prompted to set a root password for MySQL. Make sure to set a strong password. After installation, there should be no error messages.
-
Login to MySQL:
sudo mysql: This command logs we into the MySQL console using the root account.
Check: we should be able to log in without any errors. Once logged in, we'll see a MySQL prompt (
mysql>). -
Exit MySQL Console:
exit: To exit the MySQL console, simply typeexitand press Enter.
Check: Exiting the MySQL console should return we to the Linux terminal without errors.
Installing PHP:
-
Install PHP Packages:
sudo apt install php libapache2-mod-php php-mysql: Installs PHP and related packages for Apache and MySQL integration.
Check: Ensure that all three packages are installed without errors.
-
Confirm PHP Installation:
php -v: This command checks the PHP version.
Check: Running this command should display the installed PHP version information, confirming that PHP is installed.
Final Check:
-
Test LAMP Stack:
- Create a simple PHP file in the Apache web directory to test PHP and MySQL connectivity. For example, create a file named
info.phpwith the following content:
<?php phpinfo(); ?> - Create a simple PHP file in the Apache web directory to test PHP and MySQL connectivity. For example, create a file named
Place this file in /var/www/html/ (default Apache web directory).
Check: Open a web browser and access http://our_server_ip/info.php. we should see the PHP information page, indicating that PHP and MySQL are functioning correctly.
By following these steps and performing the associated checks, we can ensure that we've successfully installed the LAMP stack on our Ubuntu server.
MVC PATTERNTheModel-View-Controller (MVC) pattern is a design pattern commonly used in web development, and Laravel, a PHP framework, follows this pattern closely. MVC separates an application into three interconnected components to improve modularity, maintainability, and scalability. Here's an explanation of each component in the context of Laravel:
- Model:
- The Model represents the data and business logic of the application. It handles interactions with the database and defines the structure of the data.
- In Laravel, models are typically stored in the
app/Modelsdirectory. Each model class corresponds to a database table. Models contain methods for querying and manipulating data in the database, and they often use Laravel's Eloquent ORM (Object-Relational Mapping) for database interactions. Eloquent provides an expressive way to work with database records as objects. - Example: If we have a
Usermodel, it represents theuserstable in the database and includes methods for tasks like retrieving user records, creating new users, and updating user information.
In Laravel, when creating a model, it's important to follow certain naming conventions to ensure consistency and maintainability in our application. Laravel follows a convention-over-configuration principle, which means that if we adhere to these conventions, the framework can automatically link different components of our application together. Here's the naming convention for creating a model in Laravel:
-
Model Class Name: The class name of our model should be in
singular formand follow thePascalCase (or CamelCase)naming convention. For example, if we're creating a model for blog posts, the class name should be something likePost. -
Database Table Name: By default, Laravel assumes that our database table for the model will be the plural form of the model's name, with snake_case. For example, if our model is named
Post, Laravel will assume the table name isposts. -
Model File Location: Models are typically stored in the
appdirectory, specifically in theappnamespace. So, if our app is named "Blog," ourPostmodel file would be located atapp/Post.php. -
Namespace: The namespace of our model should correspond to the directory structure in which it's located. For example, if our
Postmodel is located in theAppdirectory, its namespace should benamespace App;.
Here's a basic example of what a Laravel model might look like following these conventions:
namespace App;

use Illuminate\Database\Eloquent\Model;

class Post extends Model
{
    // Model-specific code here
}
By following these naming conventions, Laravel can automatically link our model to its corresponding database table and provide we with a wide range of convenient methods and features for working with our data.
In Laravel's implementation of the MVC pattern, it's important to note that the name of a model class doesn't necessarily have to match the name of the corresponding database table. Laravel provides the flexibility to specify a different table name if needed. Here's how a model name can be entirely different from the database table name:
Custom Table Name Mapping:
- In some cases, we might want to use a more descriptive or convention-based name for our model class while keeping a different name for the associated database table.
- we can define a custom table name for a model by adding a
protected $tableproperty to the model class. This property allows we to specify the name of the database table that should be associated with the model. - Example:
// Model class with a custom table name class Customer extends Model { protected $table = 'customer_information'; } - In this example, the
Customermodel class is associated with thecustomer_informationtable in the database, even though the class name isCustomer. This mapping allows we to maintain a clear and expressive model class name while using a different table name in the database.
This customization feature can be particularly useful when we have naming conventions or legacy databases with table names that don't directly match our preferred model naming conventions. It provides flexibility in mapping model classes to database tables while maintaining the benefits of the MVC pattern's separation of concerns.
-
View:
- Responsibility: The View is responsible for presenting the data to the user. It defines the lawet and structure of the user interface. In web development, views typically consist of
HTML templatesmixed with dynamic data. - In Laravel: In Laravel, views are stored in the
resources/viewsdirectory. Blade is the default templating engine used for creating views in Laravel. Blade allows we to write clean and expressive templates with features like template inheritance, conditionals, loops, and more. - Example: A view might render a user profile page, displaying a user's name, email, and other details retrieved from the model.
- Responsibility: The View is responsible for presenting the data to the user. It defines the lawet and structure of the user interface. In web development, views typically consist of
-
Controller:
- Responsibility: The Controller acts as an intermediary between the Model and the View. It receives incoming requests, processes the data using the Model, and decides which View to render as a response. Controllers contain the application's business logic and control flow.
- In Laravel: In Laravel, controllers are typically stored in the
app/Http/Controllersdirectory. Each controller class defines methods (often referred to as actions) that correspond to different routes or user interactions. These methods handle HTTP requests, interact with models to retrieve or update data, and return views or JSON responses. - Example: If a user requests a profile page, a controller method might retrieve the user's data from the model, pass it to the view, and return the rendered view as the response.
The flow in a Laravel MVC application typically follows this sequence:
1. A user makes an HTTP request.
2. Laravel's routing system routes the request to the appropriate controller method.
3. The controller method interacts with the model to fetch or manipulate data.
4. The controller passes the data to the appropriate view.
5. The view renders the HTML response with the data.
6. The rendered HTML is sent as the response to the user's browser.
By separating concerns into these three components, the MVC pattern promotes code organization, maintainability, and reusability. It also facilitates collaborative development, as developers can work on different aspects of the application independently.
Folder Structure app/:
This directory is the heart of our Laravel application. It contains various subdirectories and files to organize our application's code. Certainly! I'll explain the contents of the "app" folder in a Laravel application and the default files and directories we typically find inside it:
-
Http/:
- Inside the "app" folder, the "Http" directory is where we place most of our application's HTTP-related code. It includes the following subdirectories:
a. Controllers/:
- This directory is used to store our application's HTTP controllers. Controllers handle incoming HTTP requests, process data, and return responses to the client.
b. Middleware/:
- Middleware components are stored in this directory. Middleware can perform tasks before or after an HTTP request enters our application. Examples include authentication, logging, and request preprocessing.
c. Kernel/:
- The HTTP Kernel is primarily responsible for handling incoming HTTP requests and managing the flow of these requests through the application.
- It defines a series of HTTP middleware that are executed before and after the actual route or controller action is called. Middleware can perform tasks like authentication, authorization, logging, and more.
- The app/Http/Kernel.php file is where we define the middleware and their execution order.
- The HTTP Kernel also provides a place to register route middleware, which can be applied to specific routes or route groups.
-
Providers/:
- The "Providers" directory contains service providers, which play a pivotal role in bootstrapping our Laravel application. Service providers are used for registering services, bindings, and other application-specific functionality.
-
Models/:
- This directory is where we store our application's Eloquent models. Eloquent is Laravel's ORM (Object-Relational Mapping) system, which simplifies database interactions by representing database tables as PHP objects.
-
Console/:
- This directory can be used for custom Artisan commands. we can create our own command-line tools and utilities in this folder.
-
Events/:
- In Laravel, we can use events and listeners to implement the Observer design pattern. This directory is where we would define our custom events and their associated listeners.
-
Exceptions/:
- Laravel provides a dedicated directory for custom exception classes. we can define our application-specific exceptions here to handle different error scenarios gracefully.
-
Helpers/:
- we can create custom helper functions in this directory. These helper functions can encapsulate common functionality used throughout our application.
-
Jobs/:
- Laravel's job system is used for handling tasks asynchronously. we can place job classes in this directory for background processing, queueing, and scheduling tasks.
-
Listeners/:
- In the context of Laravel events, listeners are responsible for responding to events when they are fired. This directory is where we would define our listener classes.
-
Notifications/:
- Laravel allows we to send notifications through various channels like email, SMS, and more. This directory is where we can define notification classes for our application.
-
Paymentgateway/:
- If our application interacts with payment gateways or has payment-related logic, we can create a dedicated directory to organize this functionality.
-
Providers/:
- Laravel service providers play a crucial role in registering services, bindings, and application-specific functionality. we can create custom service providers in this directory.
-
Traits/:
- Traits are reusable code snippets that we can include in multiple classes. This directory can be used to store custom traits that provide shared functionality across our application's classes.
In summary, the "app" folder in a Laravel application primarily houses our application's core logic. It's organized into subdirectories like "Http" for handling HTTP-related functionality, "Providers" for service registration, "Models" for database interactions, and additional directories as needed to structure our code effectively. The default structure encourages separation of concerns and follows Laravel's conventions for building maintainable and scalable web applications.
Bootstrap/:
Laravel is a full-featured PHP web application framework. The "bootstrap" directory is where the Laravel application is initialized and prepared for execution. This includes setting up various components and configurations required for the application to run smoothly.
- Cache Directory: This directory is used to store cached files generated by the framework. These cache files, such as route and services cache files, are generated to optimize the performance of the Laravel application. They help reduce the overhead of repetitive tasks and enhance response times.
i)Packages:
The file named "packages," is stored in the "bootstrap/cache" directory of a Laravel application. This file contains information related to the service providers and aliases used by our Laravel application. Let's break down its contents:
Purpose:
- The "packages" file is part of Laravel's optimization and caching mechanism. It stores information about various packages and their associated service providers and aliases.
A. Service Providers:
- The "providers" section lists different Laravel packages along with their corresponding service providers. Service providers are responsible for registering and bootstrapping various services, components, and functionality provided by these packages.
- Each package is represented as an array entry with the package name as the key and an array of providers as its value. For example, 'laravel/passport' is a package, and it registers the 'Laravel\Passport\PassportServiceProvider' as its service provider.
B. Aliases:
- The "aliases" section maps class aliases to their respective classes within packages. Aliases provide convenient shortcuts for accessing classes or components from packages without having to use their full namespaces.
- Just like with service providers, each package is associated with an array of class aliases. For instance, 'maatwebsite/excel' provides an alias 'Excel' for the 'Maatwebsite\Excel\Facades\Excel' class.
How It Works:
-
Laravel generates this "packages" file as part of the application's optimization process. It scans the registered packages in our Laravel application and identifies their service providers and aliases.
-
During the application's bootstrap process, Laravel references this cached file to know which service providers to load and which aliases to register, making the application startup faster and more efficient.
-
The caching mechanism ensures that Laravel doesn't need to scan and analyze the packages and their configurations every time the application runs, which can be time-consuming.
-
If we add or remove packages, or if we need to update the cache for any reason, we can use Laravel's artisan commands, such as
php artisan optimize:clear, to refresh the cached packages configuration.
In summary, the "packages" file in the "bootstrap/cache" directory of our Laravel application stores information about packages, their associated service providers, and class aliases. This cached information helps optimize the application's startup performance by avoiding the need to analyze packages on every request.
ii)Services:
The file is a cached services configuration file that is generated by Laravel and stored in the "bootstrap/cache" directory. This file plays a crucial role in Laravel's performance optimization. Let's break down its contents:
- This file caches information about service providers and deferred service providers used in our Laravel application.
A. Providers:
- This section contains an array of service providers that are registered in our Laravel application. These service providers are responsible for registering various components, services, and functionality used throughout our application.
- The service providers listed here are automatically registered during the application's bootstrapping process. They include Laravel's built-in providers as well as any custom or third-party providers we've added.
B. Eager:
- The "eager" section lists service providers that should be eagerly loaded when our application starts. Eager loading means that these providers are loaded automatically during the bootstrap process, ensuring that their services are readily available.
- Eager loading can help improve the performance of our application by avoiding lazy loading of services when they are first used.
C. Deferred:
- The "deferred" section specifies services that are deferred, meaning they are only loaded when they are explicitly requested. This deferred loading helps reduce the memory footprint of our application by loading services on-demand.
- Each deferred service is associated with the service provider responsible for providing it when needed.
How It Works:
-
This cached services configuration file is automatically generated by Laravel when we run specific commands, such as
php artisan optimize. It scans our application for registered service providers and their associated services. -
During application startup, Laravel consults this cache file to determine which service providers and services should be loaded. This process significantly reduces the time required to bootstrap the application, improving its performance.
-
If we add or remove service providers or need to update the cache for any reason, we can use Laravel's artisan commands, such as
php artisan optimize:clear, to refresh the cached services configuration.
In summary, the cached services configuration file in the "bootstrap/cache" directory optimizes the loading of service providers and services in our Laravel application, contributing to improved performance by reducing the startup time.
- app.php: The "app.php" file in the "bootstrap" directory is responsible for bootstrapping (initializing) the Laravel framework. It sets up essential components, configurations, and services needed for the application to run. This file likely serves as the entry point for our web application or framework. It's commonly used to set up the environment, configure essential services, and initialize the application. Developers often make changes to this file when they need to customize the application's behavior during the startup process. Let's break down what this file does:
A. Create The Application Instance:
- The file starts by creating a new instance of a Laravel application, which is the central component that ties together various parts of the Laravel framework.
- Instead of using Laravel's default application class (
Illuminate\Foundation\Application), it appears that a custom application class (Gecche\Multidomain\Foundation\Application) is being used. This custom class may provide additional functionality or customization specific to the project, particularly related to multi-domain support.
B. Domain Detection:
- The code includes a custom configuration parameter named
$domainParams. It defines a function named'domain_detection_function_web'. This function is used to detect the current domain or host of the incoming web request, which can be essential for multi-domain applications. It relies on the$_SERVER['HTTP_HOST']value to determine the domain.
C. Bind Important Interfaces:
- Laravel uses a dependency injection container to manage various components and services. In this section, the code binds important interfaces into the container.
- It binds three key interfaces:
Illuminate\Contracts\Http\Kernel::class: Binds the HTTP kernel, responsible for handling incoming HTTP requests for the web application.Illuminate\Contracts\Console\Kernel::class: Binds the Console kernel, which handles console commands and tasks.Illuminate\Contracts\Debug\ExceptionHandler::class: Binds the exception handler, which manages and reports exceptions that occur during the application's execution.
D. Return The Application Instance:
- Finally, the script returns the configured application instance (
$app). This application instance is the result of combining the custom application class, domain detection, and interface bindings. It's returned to the calling script, separating the initialization and configuration of the application from its actual runtime.
In summary, this file is primarily responsible for creating, configuring, and returning the Laravel application instance. It also includes specific customization related to domain detection, which suggests that it's intended for a multi-domain Laravel application. The application instance is then used to handle web requests, console commands, and exceptions in the Laravel application.
Config/:
In Laravel, the config folder is a crucial part of the application's structure that contains configuration files for various components and services used within the framework. These configuration files allow developers to customize and configure various aspects of their Laravel application without modifying the core framework files. The config folder structure typically looks like this:
config/
    app.php
    auth.php
    broadcasting.php
    cache.php
    cors.php
    database.php
    domain.php
    excel.php
    filesystems.php
    hashing.php
    logging.php
    mail.php
    queue-monitor.php
    queue.php
    sanctum.php
    services.php
    session.php
    view.php
    ...
Each of these files corresponds to a specific configuration category within our Laravel application. Let's briefly explain some of the common configuration files we'll find in the config folder:
Here are brief descriptions of all the configuration files found in the Laravel config folder:
-
app.php: General application configuration settings, including the application name, environment, timezone, and more. -
auth.php: Authentication configuration, specifying authentication drivers, user providers, and password reset settings. -
cache.php: Cache configuration for controlling caching mechanisms, including cache drivers and cache stores. -
database.php: Database connection configuration, specifying database drivers, connection details, and other database-related settings. -
filesystems.php: Filesystem configuration for managing file storage, including local and cloud-based storage options. -
mail.php: Email configuration, defining SMTP server settings, email drivers, and default email sender information. -
queue.php: Queue service configuration, setting up queue drivers and connection details for background job processing. -
services.php: Configuration for third-party services and APIs, such as social media authentication providers. -
session.php: Session configuration, including the session driver, session lifetime, and secure session options. -
view.php: View and template configuration, allowing customization of view storage paths and other view-related settings. -
cors.php: Cross-Origin Resource Sharing (CORS) configuration for controlling access to our API from different domains. -
broadcasting.php: Broadcasting and WebSocket configuration, specifying drivers and options for real-time broadcasting. -
domain.php: Custom domain-specific configuration, used for environment-specific or context-specific settings. -
excel.php: Configuration for working with Excel files, including export and import settings. -
filesystems.php: Additional filesystem configuration, typically for cloud storage options beyond the default local storage. -
hashing.php: Password hashing configuration, defining the hashing algorithm and options for securing user passwords. -
logging.php: Application logging and log storage configuration, setting up log channels, storage locations, and log levels. -
queue-monitor.php: Configuration for Laravel Queue Monitor, a tool for monitoring and managing queued jobs, including statistics and job details. -
sanctum.php: Configuration for Laravel Sanctum, a package used for API authentication and token management, allowing customization of token behavior and security settings.
These configuration files give developers fine-grained control over various aspects of a Laravel application, making it possible to adapt the framework to specific project requirements and customize its behavior as needed.
Database/:
-
**Migrations (
database/migrations)`: This directory stores database migration files. Migrations are a way to version-control our database schema and make it easy to create, modify, and roll back database tables and columns. -
**Seeders (
database/seeders)`: In this directory, we can define seeder classes that populate our database with initial or test data. Seeders are often used in conjunction with migrations to populate database tables. -
**Factories (
database/factories)`: Factory classes help generate fake data for our application, which is useful for testing and seeding our database with realistic data.
Database Models: While not located in a specific "Database" folder, Eloquent models (representing database tables) are typically stored in the app directory under the Models subdirectory.
Together, these components in Laravel's directory structure make it easier to manage and work with databases, ensuring robust database schema management, data seeding, and data manipulation within our application.
Public/:
In Laravel, the public folder is a critical part of the application's structure where publicly accessible assets and files are stored. Here's a brief overview of the public folder structure:
-
index.php: This is the entry point of our Laravel application. When a request is made to our application, the web server typically directs it to this
index.phpfile, which then bootstraps the Laravel framework and processes the request. -
.htaccess (or web.config for IIS): These configuration files are used to configure URL rewriting and routing for the application. They help in making URLs cleaner and more user-friendly.
-
css, js, and images folders: These folders store our application's CSS stylesheets, JavaScript files, and image assets, respectively. These assets are publicly accessible and can be linked to from our HTML templates to style and enhance our web pages.
-
favicon.ico: This is the icon that appears in the browser tab when our application is open. It's a small graphical representation of our application or website.
-
robots.txt: This file can be used to instruct web crawlers (like search engine bots) on how to interact with our site. we can use it to allow or disallow specific pages or directories from being indexed by search engines.
-
index.html: An optional HTML file that can be used as a placeholder or for custom error pages. It may contain information about the application or instructions for users.
The public folder is intentionally designed to be publicly accessible via a web browser. This means that only the files and assets placed in this folder can be directly accessed by users, while the rest of our application's code and files are kept private. This separation of public and private assets enhances security and improves the organization of our Laravel project.
Resources/:
This folder typically contains raw assets such as CSS (Cascading Style Sheets) files and JavaScript (JS) files, along with other frontend resources like images. These assets are often used during development and may require processing (e.g., compilation, minification) before being deployed to the public folder for public access. CSS files define the styles and lawet of our web pages, while JavaScript files add interactivity and dynamic behavior to our frontend.
1. views: This folder contains Blade templates that define the structure and presentation of our application's web pages. Blade is Laravel's templating engine, and these templates are used to generate HTML views. we can also include CSS and JavaScript directly within Blade templates to enhance the styling and functionality of specific views.
2. css and js: These folders are used for managing the source files of CSS (e.g., Sass or Less) and JavaScript. we can write and organize our styles and scripts in these folders, which are often compiled and optimized into CSS and JavaScript files for use in our application.
In summary, the resources folder in Laravel is a central location for managing various assets and resources used throughout our application, including CSS and JavaScript files. It provides a structured approach to organizing and customizing the frontend aspects of our web application.
Routes/:
In Laravel, routes are a fundamental part of defining how our application responds to incoming HTTP requests. Routes determine which controller method or closure should be called when a specific URI is accessed. Laravel provides a flexible and expressive routing system that can be defined in various ways.
-
web.php: This file (usually named
web.php) contains routes related to web-based user interfaces. It defines routes for rendering HTML views and handling web requests from browsers. These routes often handle actions like displaying web pages, processing forms, and interacting with the user interface. -
api.php: The
api.phpfile contains routes specifically for API endpoints. These routes are often used for creating RESTful APIs or handling JSON requests. They are designed to respond with JSON data and are commonly used for building web services. -
console.php: In Laravel, we can also define Artisan console commands as routes. These routes are typically placed in the
console.phpfile. They allow we to create custom command-line actions for our application. -
channels.php In Laravel, the
channels.phpfile in theroutesdirectory is used to define broadcasting channels and their authorization logic for real-time events. Channels represent specific topics or resources in our application. The authorization callback function within each channel definition determines if a user is authorized to access that channel. This setup is crucial for broadcasting events to connected clients, making real-time communication and updates possible in our Laravel application.
By splitting routes into different files, Laravel helps maintain a clean and organized routing structure, making it easier to manage routes for different aspects of our application. Each of these files plays a specific role in defining routes for web, API, and console functionality, contributing to a well-structured Laravel application.
Storage/:
In Laravel, the storage folder is essential for managing files that our application generates or uses internally. Here's a brief overview of the storage folder structure:
-
framework: Within this folder, we'll find several subdirectories:
- cache: Temporary cache files generated by Laravel, often used for performance optimization.
- sessions: Session data files if our application uses server-side sessions.
- views: Compiled Blade templates for faster rendering of views.
-
logs: Application log files, which capture information, warnings, and errors generated during application execution. Log files can be essential for debugging and monitoring.
The storage folder is essential for organizing various types of application-generated data and files. It separates public-accessible files in the public folder from internal application data, logs, and caches in other subdirectories, helping to keep our Laravel application organized and efficient.
Tests/:
In Laravel, the tests folder is where we organize and run tests for our application. This folder follows a specific structure to help we create and manage test cases efficiently. Here's a brief overview of the tests folder structure:
-
Feature: The
tests/Featuredirectory is typically used for feature tests, which test the behavior of our application from an end-user perspective. Feature tests simulate user interactions with our application and verify that the expected outcomes occur. -
Unit: The
tests/Unitdirectory is for unit tests, which focus on testing individual components or units of our code in isolation. Unit tests help ensure that specific functions or classes work correctly. -
CreatsApplicaton.php:The
testsdirectory of a Laravel application, plays a crucial role in setting up the Laravel application environment for testing. Here's a brief explanation of its function:
A. Application Creation:
- The
CreatesApplicationtrait defines a method calledcreateApplication. This method is responsible for creating a new instance of the Laravel application specifically configured for testing.
B. Bootstrap Laravel Application:
- Inside the
createApplicationmethod, it includes thebootstrap/app.phpfile. This file serves as the entry point for Laravel applications.
C. Bootstrapping the Kernel:
-
After including
bootstrap/app.php, the method bootstraps the Laravel application by invoking thebootstrapmethod on the Laravel application's Kernel class, which implementsIlluminate\Contracts\Console\Kernel. -
Bootstrapping the Kernel initializes various components of the application, including service providers, configuration, and error handling, setting up the application environment for testing.
D. Return the Application:
- Finally, the
createApplicationmethod returns the fully bootstrapped Laravel application. This prepared application instance is used by testing frameworks like PHPUnit to execute test cases.- TestCase.php:
The
TestCase.phpfile, located in thetestsdirectory of a Laravel application, is a fundamental component for writing and running tests. This file is part of Laravel's testing framework and typically includes the following key elements:
- TestCase.php:
The
i. Namespace Declaration:
- It declares the PHP namespace for the
TestCaseclass within theTestsnamespace, allowing for proper class organization and separation.
ii. Class Inheritance:
- The
TestCaseclass extendsIlluminate\Foundation\Testing\TestCase(which itself extends PHPUnit'sTestCase). This establishes a foundation for Laravel-specific testing capabilities and functionalities.
iii. Trait Inclusion:
- The
use CreatesApplication;statement includes theCreatesApplicationtrait, which we discussed earlier. This trait is responsible for setting up the Laravel application environment for testing.
By extending Illuminate\Foundation\Testing\TestCase and including the CreatesApplication trait, this TestCase class provides a base for writing tests in Laravel. It initializes the Laravel application environment for testing, bootstraps the application, and makes various testing helpers and assertions available to our test cases.
Laravel's testing structure encourages the separation of different types of tests (feature, unit, browser) and provides a convenient location for organizing and running tests for our application. Writing tests is a crucial aspect of ensuring the reliability and correctness of our Laravel application.
Vendor/:
In Laravel, the vendor folder is a critical part of the application's directory structure, and it contains all the dependencies and packages that our Laravel application relies on. Here's a brief explanation of the vendor folder structure and the files and folders found inside it:
-
composer.json and composer.lock:
- These two files at the root of the
vendorfolder are used by Composer, a PHP dependency manager.composer.jsonlists the project's dependencies and their versions, whilecomposer.locklocks the exact versions used to ensure consistency across environments.
- These two files at the root of the
-
composer:
- The
composerfolder contains Composer-related files and cache, including autoloader configuration files and the Composer binary.
- The
-
laravel:
- Inside the
laravelfolder, we'll find Laravel-specific packages and extensions, which are maintained by the Laravel framework team. These packages include things like Laravel's authentication system, notifications, and more.
- Inside the
-
monolog:
- The
monologfolder contains the Monolog library, a popular logging library used by Laravel for logging and error handling.
- The
-
phpunit:
- Laravel includes PHPUnit, a testing framework for PHP, in the
phpunitfolder. This allows we to run tests for our application.
- Laravel includes PHPUnit, a testing framework for PHP, in the
-
symfony:
- Laravel relies on various components from the Symfony framework. The
symfonyfolder contains these components, which handle various aspects of the Laravel framework, such as routing, HTTP requests, and more.
- Laravel relies on various components from the Symfony framework. The
-
doctrine:
- The
doctrinefolder contains the Doctrine Common and Doctrine Database Abstraction Layer (DBAL) libraries, which Laravel uses for database interactions, migrations, and more.
- The
-
guzzlehttp:
- Laravel uses Guzzle, an HTTP client library, for making HTTP requests. The
guzzlehttpfolder contains Guzzle and its dependencies.
- Laravel uses Guzzle, an HTTP client library, for making HTTP requests. The
-
vlucas:
- Inside this folder, we'll find the
dotenvpackage, which Laravel uses to load environment variables from the.envfile.
- Inside this folder, we'll find the
-
Other Dependencies:
- Depending on our Laravel project's specific requirements and the packages we've installed, we may see additional folders corresponding to other dependencies and packages our application uses.
The vendor folder is automatically generated and managed by Composer, which installs and updates the project's dependencies based on the information specified in the composer.json file. This separation of application code and third-party dependencies makes it easier to manage and maintain Laravel applications and ensures that we can keep our dependencies up-to-date and secure.
.ENV/:
APP_NAME=SREMV3DEV
APP_ENV=local
APP_KEY=base64:KSqDPsf2cj8Ay4jMn4h7Q3IYvSJY3IDthO8FqlFdqgE=
APP_DEBUG=true
APP_URL=http://localhost/SREMV3
APP_LANGUAGE=en
APP_THEME_FOLDER=default-
APP_NAME: This sets the name of our Laravel application to "SREMV3DEV." -
APP_ENV: It specifies that the application is in the "local" environment. Different environments (e.g., local, production) can have different configurations. -
APP_KEY: This is the application key used for encryption and security. It's generated during the Laravel installation process. -
APP_DEBUG: This variable is set to "true," indicating that debugging is enabled in the local environment. It's essential for troubleshooting during development but should be set to "false" in production for security reasons. -
APP_URL: It defines the base URL of our application. In this case, it's set to "http://localhost/SREMV3." -
APP_LANGUAGE: Specifies the default language for the application, which is set to "en" (English). -
APP_THEME_FOLDER: This variable sets the theme folder to "default."
LOG_CHANNEL=stack
LOG_DEPRECATIONS_CHANNEL=null
LOG_LEVEL=debug-
LOG_CHANNEL: It defines the logging channel for our application. Here, it's set to "stack," which means it will use multiple channels for logging. -
LOG_DEPRECATIONS_CHANNEL: Specifies the channel for logging deprecation warnings. It's set to "null," meaning no specific channel is used for deprecation logs. -
LOG_LEVEL: Sets the log level to "debug," meaning all log messages, including debug messages, will be recorded.
DB_CONNECTION=mysql
DB_HOST=127.0.0.1
DB_PORT=3306
DB_DATABASE=sremv3dev
DB_USERNAME=root
DB_PASSWORD=-
DB_CONNECTION: Specifies the database connection type as MySQL. -
DB_HOST: Sets the database host to "127.0.0.1." -
DB_PORT: Specifies the database port as "3306." -
DB_DATABASE: Defines the name of the database as "sremv3dev." -
DB_USERNAMEandDB_PASSWORD: These variables specify the database username and password, which should be configured according to our database setup.
BROADCAST_DRIVER=log
CACHE_DRIVER=file
FILESYSTEM_DISK=local
QUEUE_CONNECTION=database
SESSION_DRIVER=file
SESSION_LIFETIME=120
a) BROADCAST_DRIVER:
-
BROADCAST_DRIVERspecifies the broadcasting driver that Laravel should use for broadcasting events to real-time channels. Laravel supports multiple broadcasting drivers, including "log," "pusher," "redis," "null," and custom drivers. -
Example:
BROADCAST_DRIVER=pusher
b) CACHE_DRIVER:
-
CACHE_DRIVERdetermines the caching mechanism used by Laravel to store and retrieve cached data. Laravel supports various caching drivers like "file," "database," "memcached," "redis," and others. -
Example:
CACHE_DRIVER=redis
c) FILESYSTEM_DISK:
-
FILESYSTEM_DISKspecifies the default disk that Laravel should use for file storage operations. Laravel's filesystem abstraction allows we to define multiple disks, each with its own configuration. This variable sets the default disk for operations like file uploads and storage. -
Example:
FILESYSTEM_DISK=local
d) QUEUE_CONNECTION:
-
QUEUE_CONNECTIONsets the default queue connection that Laravel should use for handling queued jobs and tasks. Laravel supports different queue backends, including "sync" (synchronous), "database," "redis," and others. -
Example:
QUEUE_CONNECTION=redis
e) SESSION_DRIVER:
-
SESSION_DRIVERspecifies the driver that Laravel should use for session management. Sessions allow we to store and retrieve user-specific data across multiple requests. Laravel supports various session drivers, including "file," "database," "redis," and "cookie." -
Example:
SESSION_DRIVER=database
f) SESSION_LIFETIME:
-
SESSION_LIFETIMEsets the duration (in minutes) for which a session should remain active. After this duration of inactivity, the session will expire, and the user will need to log in again. -
Example:
SESSION_LIFETIME=120(session expires after 2 hours of inactivity)
These configuration variables are essential for customizing the behavior of our Laravel application based on our specific requirements and the underlying infrastructure we are using. we can adjust these settings in the .env file to match the needs of our project, whether we're configuring caching, managing queues, handling sessions, or broadcasting real-time events.
The .env file serves as a central place to configure various aspects of Laravel application, and it should be customized based on application's specific requirements and environment settings.
composer.json/:
In a Laravel application, the composer.json file is a critical configuration file that manages the application's PHP dependencies and provides essential metadata about the project. It is used in conjunction with Composer, a PHP dependency management tool, to install, update, and manage the packages and libraries that our Laravel application relies on. Here's an explanation of the key aspects of the composer.json file:
Let's break down each section:
-
Project Information:
"name": Specifies the name of the project or package. In this case, it's named "laravel/laravel.""type": Indicates that this is a project, not a package."description": Provides a brief description of the project, which is "The Laravel Framework.""keywords": Keywords associated with the project, such as "framework" and "laravel.""license": Specifies the project's licensing terms, which is "MIT" in this case.
-
Dependencies (require):
- Lists the required PHP and Laravel package dependencies for the project, along with their version constraints.
-
Development Dependencies (require-dev):
- Lists development-specific dependencies, such as testing libraries, development tools, and packages that are not needed in production.
-
Autoload Configuration:
"autoload": Defines the PSR-4 autoloading rules for the project's source code and namespaces."autoload-dev": Specifies the autoloading rules for development-specific code.
-
Scripts:
- Contains custom scripts to be executed during Composer operations, such as
post-autoload-dumpfor autoloading andpost-update-cmdfor vendor package publishing.
- Contains custom scripts to be executed during Composer operations, such as
-
Extra Configuration:
"extra": Additional configuration settings for Laravel projects, such as packages that should not be auto-discovered.
-
Composer Configuration:
"config": Global Composer configuration settings, including autoloader optimization, package installation preferences, and plugin settings.
-
Stability and Preference:
"minimum-stability": Sets the minimum stability level for packages. In this case, it's "stable.""prefer-stable": Indicates a preference for stable packages when resolving dependencies.
This composer.json file provides a complete picture of the project's dependencies, autoloading rules, scripts, and other configuration details. Composer uses this file to install and manage the project's dependencies according to the specified constraints. Developers can add or update dependencies by modifying this file and running Composer commands like composer update or composer install.
composer.lock/:
The composer.lock file in a Laravel project is a critical component of Composer's dependency management system. It complements the composer.json file and serves several important purposes:
-
Dependency Version Locking:
- The primary purpose of the
composer.lockfile is to lock in the specific versions of all the dependencies (PHP packages and libraries) used by our Laravel project. It records the exact versions of each package and all of its transitive dependencies.
- The primary purpose of the
-
Deterministic Builds:
- By recording precise version information, the
composer.lockfile ensures that our project will be built with the exact same dependencies every time, regardless of when or where it is installed. This deterministic behavior is essential for ensuring that our application remains stable and consistent across different environments, such as development, testing, and production.
- By recording precise version information, the
-
Faster Installations:
- Composer uses the
composer.lockfile to speed up dependency installations. When we runcomposer install, Composer checks thecomposer.lockfile first and installs the specified versions directly, bypassing the need to resolve dependencies again. This significantly reduces installation time.
- Composer uses the
-
Security and Reliability:
- The
composer.lockfile enhances the security and reliability of our application by preventing unintended updates to dependencies. Without it, runningcomposer updatecould lead to potentially breaking changes if newer versions of packages are fetched.
- The
-
Shared Project Information:
- The
composer.lockfile can be committed to version control (e.g., Git), allowing our entire development team to work with the same set of dependencies. This ensures consistency and eliminates the "works on my machine" problem.
- The
-
Integration with Continuous Integration (CI):
- Continuous integration systems can use the
composer.lockfile to recreate a known and tested environment for automated testing and deployment.
- Continuous integration systems can use the
It's important to note that we should always commit the composer.lock file to version control. This ensures that everyone working on the project, including other developers and deployment environments, uses the exact same dependency versions. To update our dependencies while keeping the locked versions, we can run composer update (without specifying a package name). This updates the composer.json file with newer versions but maintains the locked versions in composer.lock.
LANDING PAGE
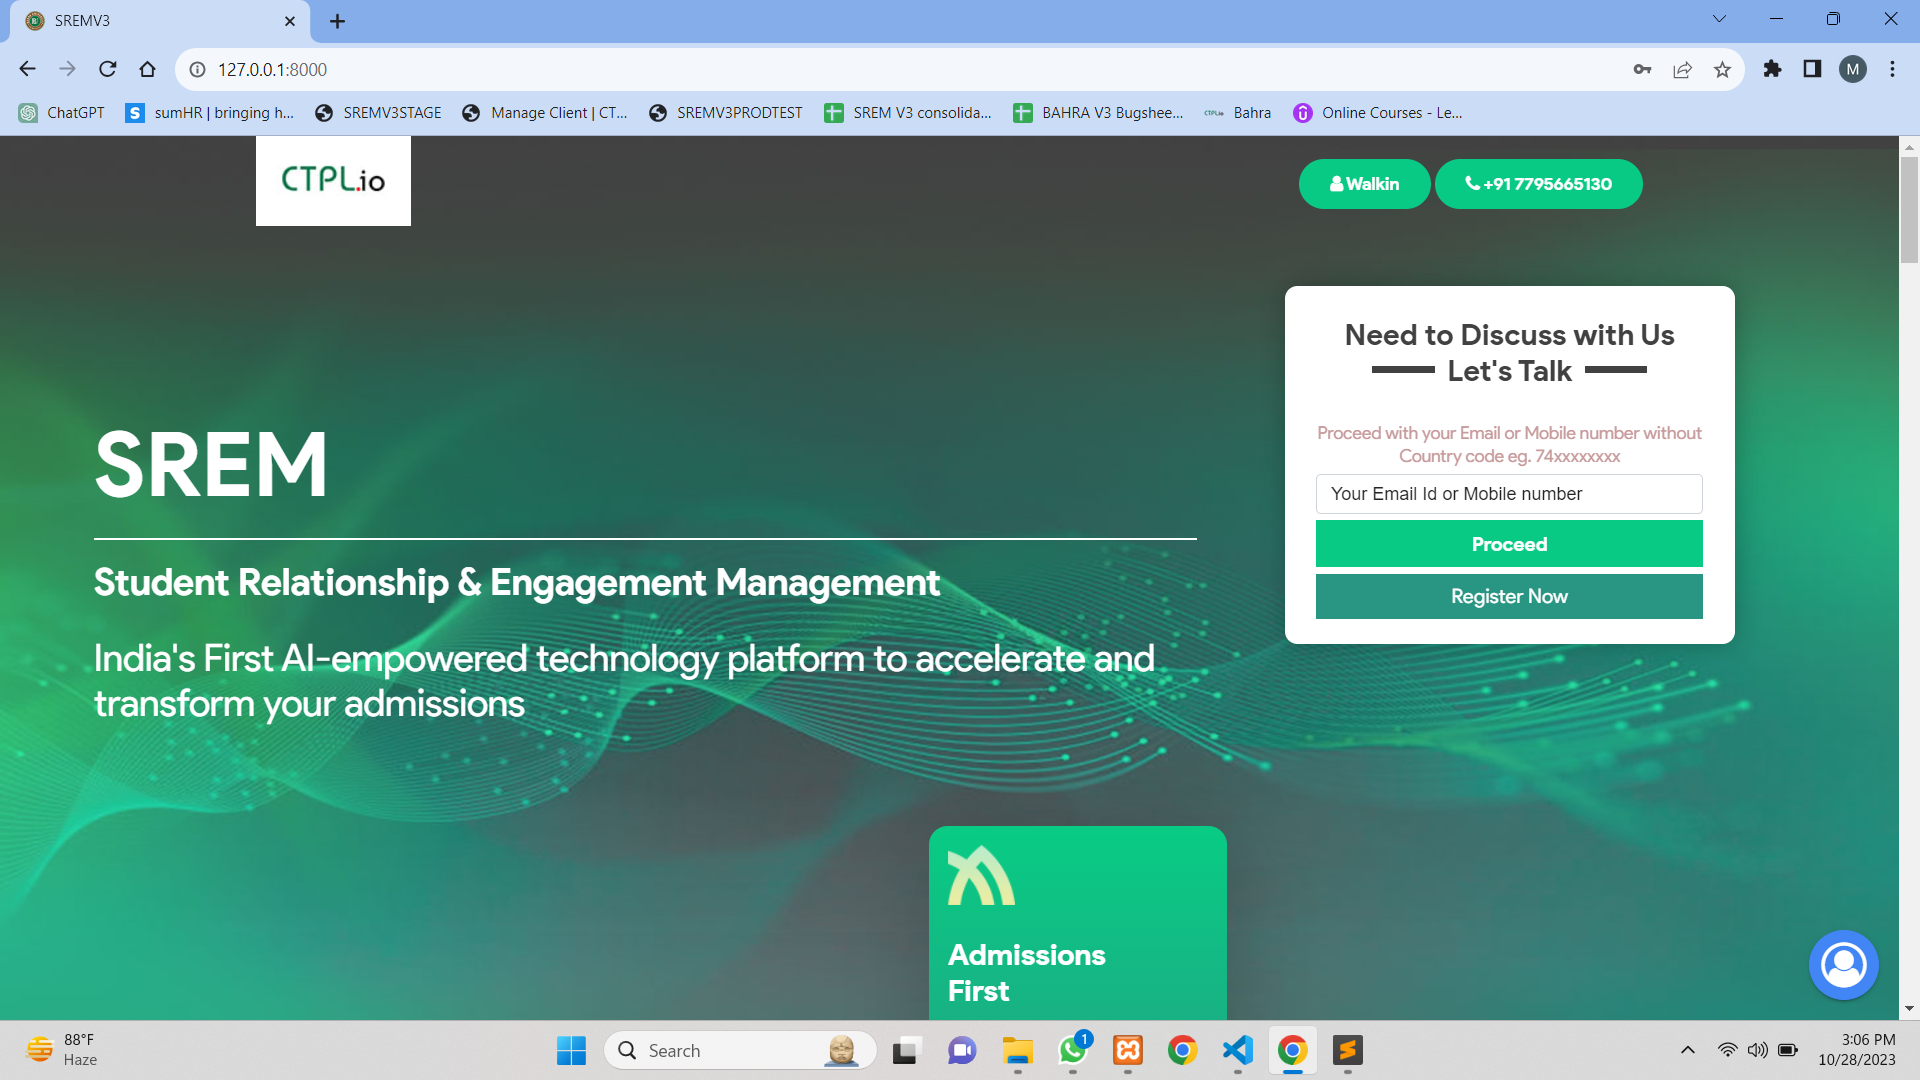A landing page is a single web page designed with a specific goal in mind, typically to convert visitors into leads or customers. It's often the first page visitors see after clicking on an online advertisement or a search result. Landing pages are commonly used in digital marketing and advertising campaigns to i)Lead Generation ii)Product Sales, and iii)Event Registration.
i) Lead Generation
Lead generation is the process of identifying and attracting potential customers (leads) for a business's products or services. The goal of lead generation is to initiate and nurture consumer interest in a company's offerings, with the ultimate aim of converting these leads into paying customers
ii) Event Registration
Event registration for student admission typically refers to the process of enrolling students in educational institutions such as schools, colleges, universities, or other educational programs. This process is essential for managing and organizing the admission of new students for each academic year or semester.
- Our landing page blade file is located in
resources/views/default/frontend/layouts/banner.blade.phpit's where we define the structure and content of our landing page.
In our project we have multiple user types, including admin, super admin, client admin, vendor, and student etc. Each user type may have their own dashboard, which can be the same as or different from the dashboards of other user types. The dashboards are tailored to the specific needs and functions associated with each user type. Within each user type, there are different roles assigned. These roles determine what functions a user can see and modify. Roles enable fine-grained control over the permissions and access levels for users, ensuring that they can perform specific actions based on their role within the system.
-
Super Admin User Type: Super Admins have extensive access to all functions within the system with minimal restrictions. They often have the highest level of control and are responsible for managing the entire application.
-
Admin User Type: Admins, while having access to various functions, operate with certain restrictions and limitations. This ensures that they don't have full access to all system features. Admins typically handle specific administrative tasks within the application.
-
Other User Types: Other user types, such as client admins, vendors, and students, may also have their own unique access restrictions and permissions. This tailors the experience for each user type and aligns with their specific roles and responsibilities.
Interaction flow with our application By Student /:
-
Student Input: When a student accesses our landing page , they are required to fill in various mandatory input fields. These fields likely contain information necessary for a specific process, such as admission or registration.
-
Data Validation: After the student submits the form, the data they've provided is validated to ensure it meets certain criteria. This validation process checks for unique mobile number .
-
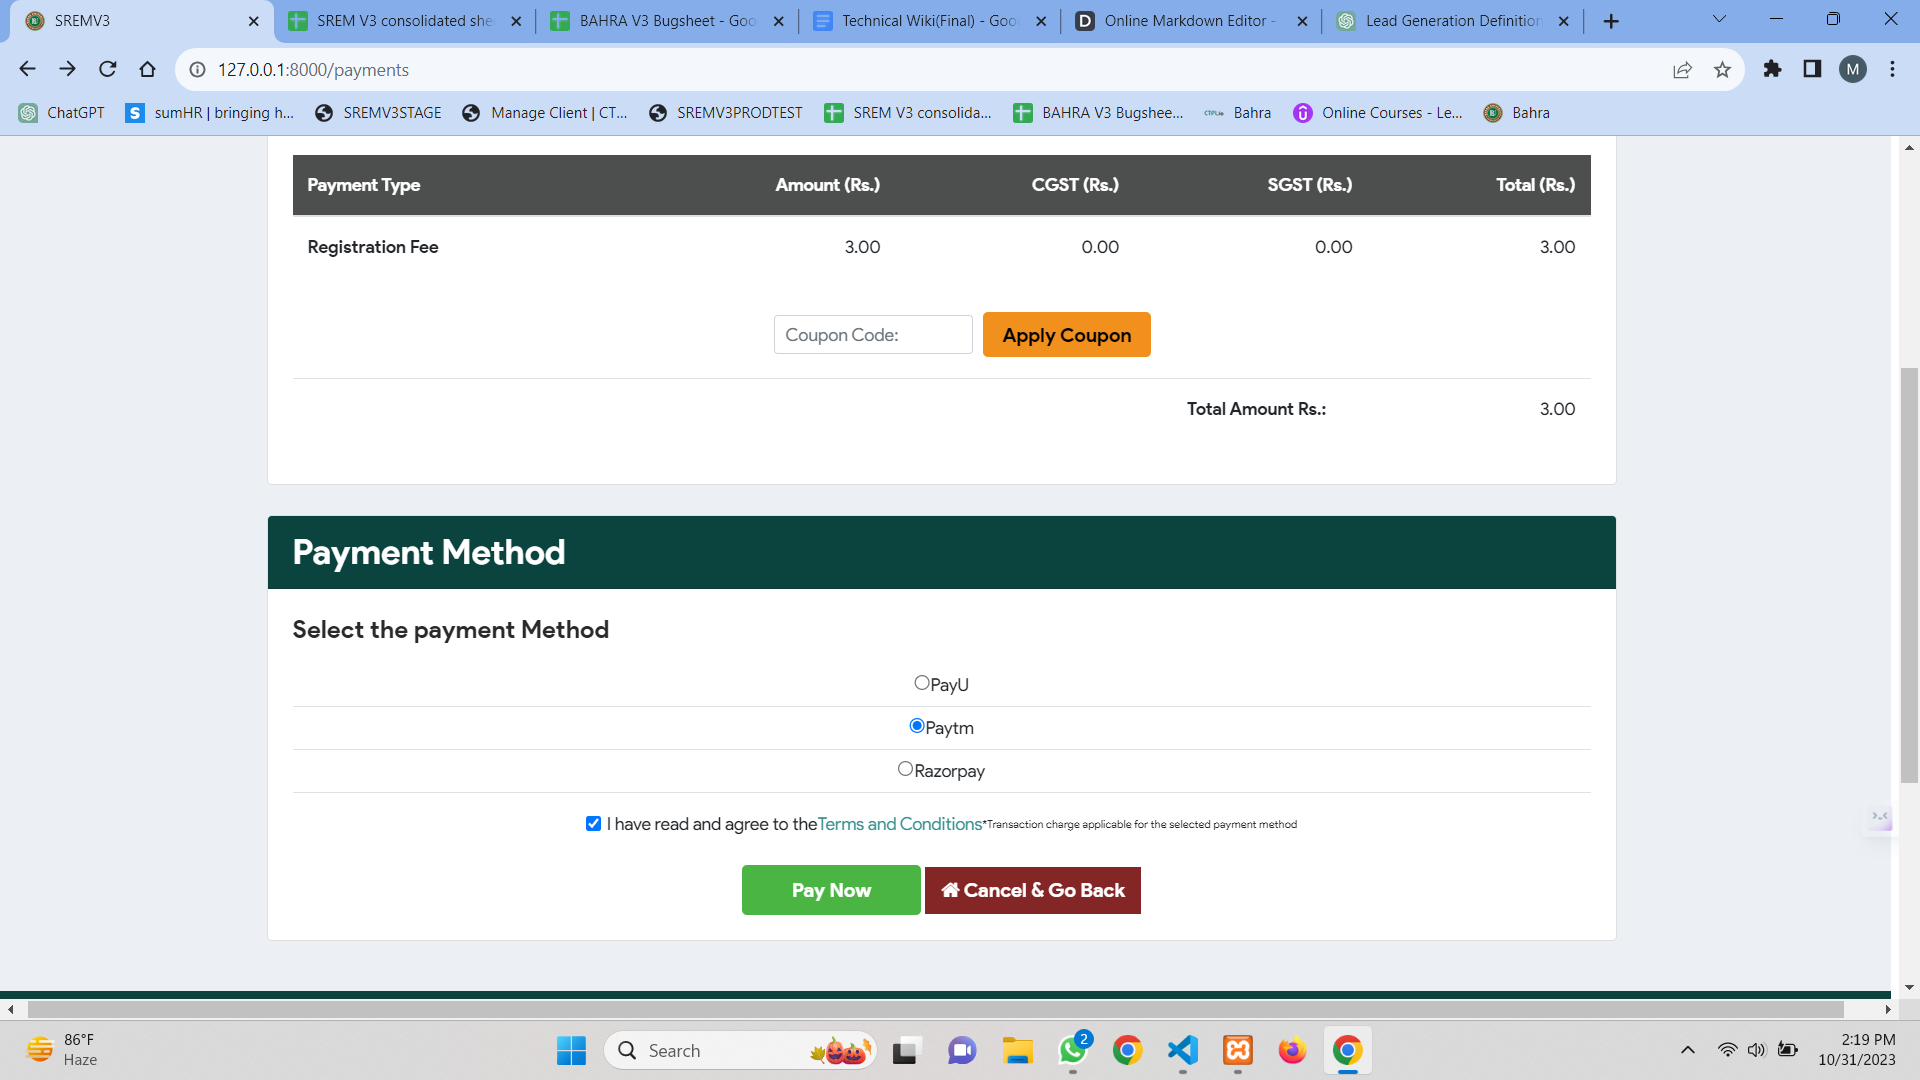
Redirection: Depending on how we've set up the payment form position or the specific logic in our application, the student is redirected to a subsequent page. This redirection could lead them to a payment page or another relevant section of the application. i) If the payment form is a separate step, they would be directed to the payment page. ii) If the payment form is integrated into the same process, the student might be redirected to the payment form on the same page.
web.php
- The particular route, named "payments.index," is designed to respond to a wide range of HTTP request methods, including GET, POST, PUT, DELETE, and more. When a user accesses a specific URL with "/payments," this route is triggered. The route is set to be handled by the "PaymentController," a controller that organizes related request handling logic, located within the "Frontend" folder. More specifically, it specifies that the "index" method within the "PaymentController" will execute the necessary logic for this route.
PaymentController@index
-
Request Handling: The method starts by getting access to the request object, which allows it to access data sent by the user's HTTP request. It also retrieves information about the currently authenticated user.
-
Referral Source Handling: The code checks and stores the referral source site (commonly through a query parameter named 'source' in the URL) into the
$vendorSourcevariable. If not found in the query parameters, it looks for it in the user's session data or the user's 'registration_source' attribute. -
Session Data Retrieval: The code retrieves previously stored payment initiation details from the user's session and assigns them to the
$sessionDetailsvariable. -
Form Data Handling: It retrieves the form data submitted by the user through the request object. If the data is missing but stored in the session, it merges it into the request data.
-
Referer Module: The
$referer_modulevariable is set to either the value provided in the form data or from the session's 'referer_module' key. -
User Form Details: The code fetches user-specific form details based on the request and the currently authenticated user. These details include information about applied forms.
-
Session Cleanup: The code clears the stored 'paymentInitiate' data from the user's session.
-
Redirection Logic: Depending on the user's role (as determined by
$currentUser->isStudent), the code sets the redirection destination. If the user is not a student, they are redirected to the 'Admin.Dashboards' route; otherwise, they are directed to 'MyDashboards.' -
Payment Data Validation: The code performs a series of checks to ensure that the payment data is correct. If the necessary data is not present or incorrect, an error message is logged, and the user is redirected to the appropriate dashboard with an error message.
-
Payment Processing: If the payment data is found to be correct, the code continues to process further. It calculates payable data and fee details, performs checks, and prepares the necessary information for the payment process.
-
Zero Fee Check: There is a check to ensure that the calculated payment amount is not zero unless the program allows for zero fees. If the amount is zero and not allowed, an error message is logged, and the user is redirected.
-
View Rendering: If all checks are passed, the code sets session data and renders a view, presumably displaying payment details for the user to proceed with payment.
-
Error Handling: If any issues are encountered at any point in the process, error messages are logged, and the user is redirected with a corresponding error message.
Overall, this code appears to manage the handling of user payments, including data validation, redirection, and error handling, within a Laravel application. It integrates with user sessions to store and retrieve relevant data as the user progresses through the payment process
web.php
The particular route, named "payments.request" sets up a POST route with the URL path "/payments/request." When a POST request is made to this URL, it directs the request to the request method in the PaymentController within the "Frontend" Folder. The route is specifically designed to handle payment requests.
PaymentController@request
The request method in the PaymentController is responsible for processing payment requests.
1.Request Handling: The method begins by obtaining access to the request object, which allows it to retrieve data sent by the user's POST request. It also fetches information about the currently authenticated user.
2.Data Initialization: It initializes a response array with a default "invalid request" message and sets the success flag to false. Additionally, it retrieves data submitted in the request.
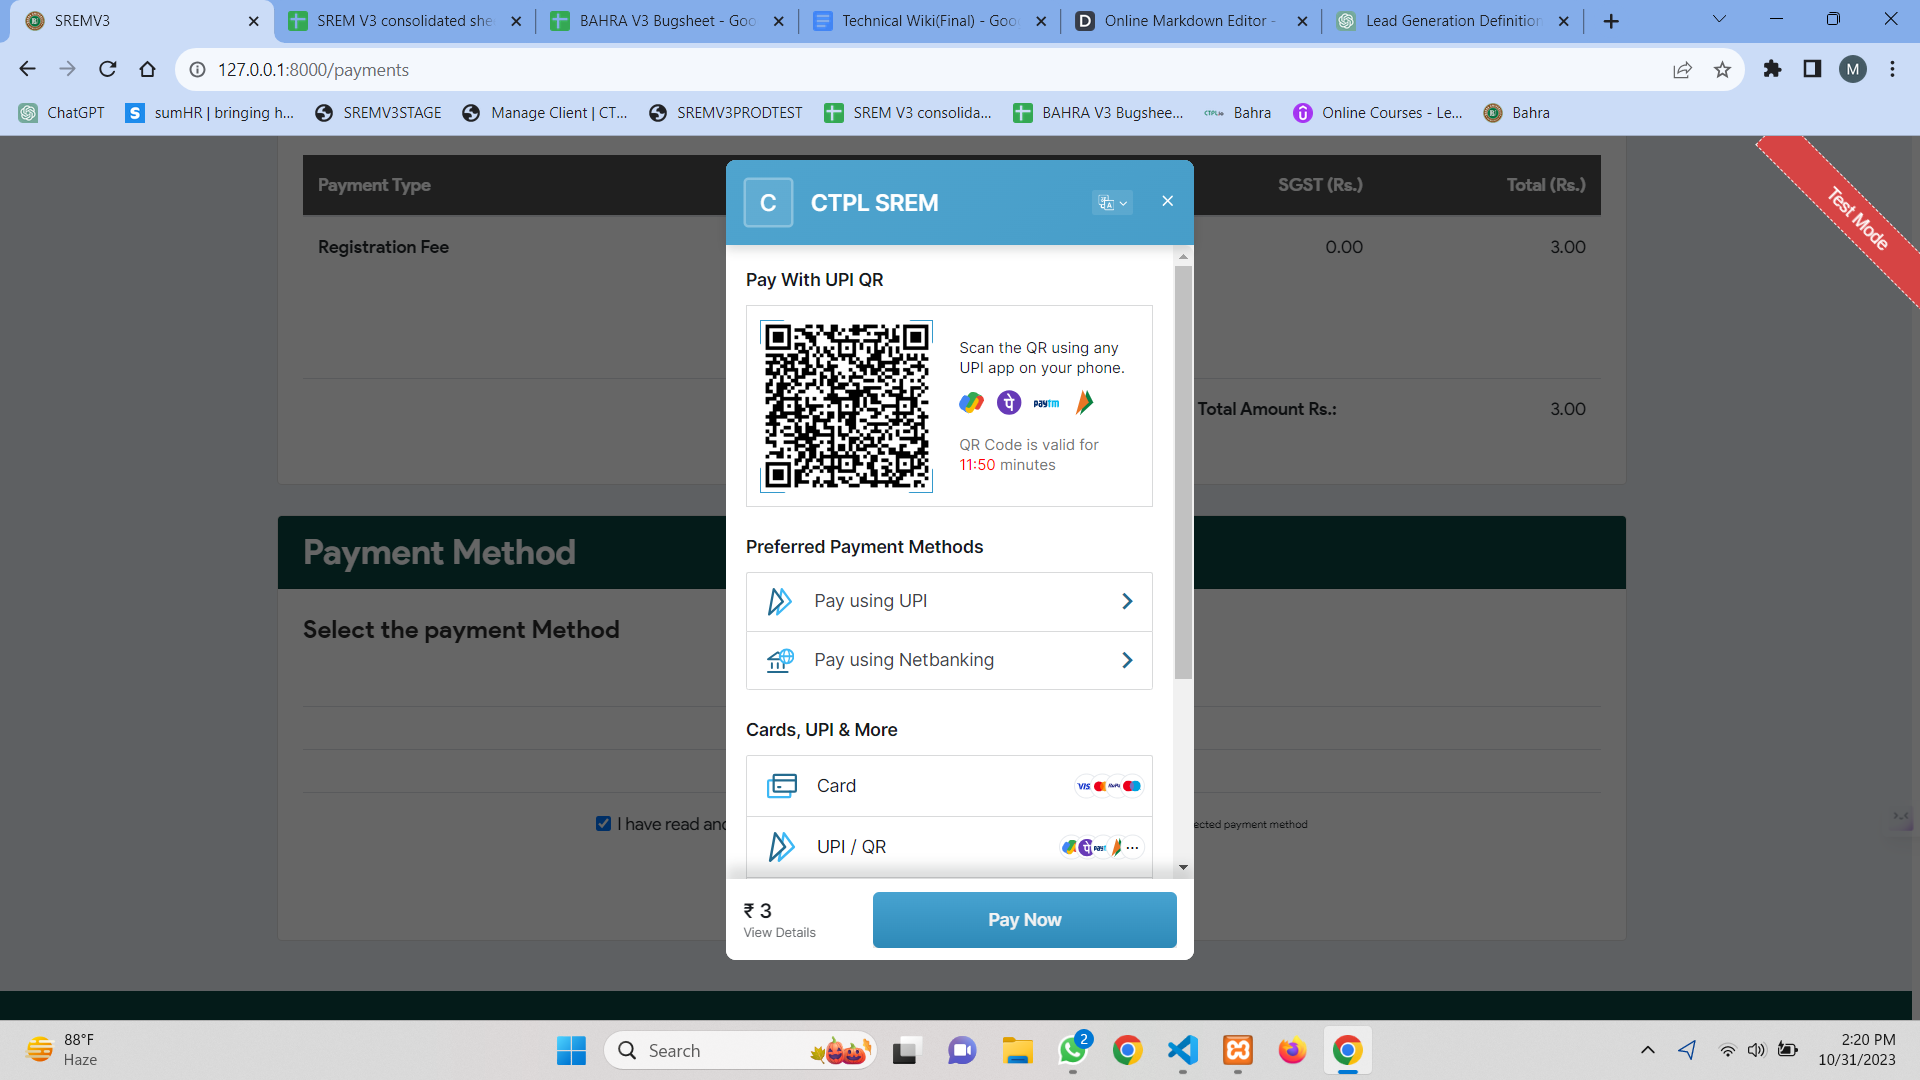
3.Payment Gateway Selection: The code checks if the user has selected a payment gateway and retrieves it from the submitted data. It also determines the payment type and referral source based on the request and user's session.
4.Session Data Handling: The method retrieves previously stored payment initiation details from the user's session, including payment details, user form details, and payment configuration.
5.Payment Configuration Update: If the selected payment gateway differs from the one in the stored payment configuration, the code updates the payment configuration based on the user's selection.
6.Payment Initialization: The code proceeds to initialize a new payment, considering details such as the user's information, payment gateway, and payment status, setting it to "Payment Initiated." It creates a reference ID for the payment, incorporating various details, and stores other payment-related data.
7.Payment Amount Calculation: The method calculates the payment amount, taking into account taxes, discounts, and transaction charges, and updates the payment details accordingly.
8.Multiple Payments Handling: If the payment involves multiple items or payments, the code itemizes and stores these details in the payment.
9.Payment Gateway Handling: The code includes the specific payment gateway controller based on the user's selection, instantiates the controller class, and calls the getRequestForm method to generate the payment request form or data.
10.Payment Request Form Data: The payment request form data is stored in the payment's request_api field.
11.Response Generation: Depending on the success or failure of the payment request and processing, the code generates a response array with appropriate success status, error messages, and data.
12.JSON Response: The final response is converted to a JSON format and returned to the client. This response typically contains information regarding the success of the payment request and the associated data.
In summary, the request method in the PaymentController is responsible for processing payment requests, including the selection of payment gateways, calculation of payment amounts, and the generation of payment request forms or data. It also includes error handling and returns responses in a structured JSON format. This method is mapped to the "/payments/request" route, allowing it to handle payment requests made via HTTP POST requests.
web.php
The particular route, named "payments.request" handle POST requests to the "/payments/response" URL path and direct them to the "response" method in the "PaymentController." It is named "payments.response" for reference and URL generation purposes. Typically, this route would be used for processing responses or acknowledgments related to payment transactions within your Laravel application.
PaymentController@response
The response method in the PaymentController is responsible for handling responses from payment gateways and processing them.
-
Request Handling: The method receives a
Requestobject, which allows it to access data sent in the HTTP POST request. It also retrieves information about the currently authenticated user. -
Data Retrieval: The code extracts all the data from the request using
$request->all(). It also retrieves the selected payment gateway from the request using$request->input('pgway', ''). -
Payment Gateway Controller: Based on the selected payment gateway, the code includes the corresponding payment gateway controller file and instantiates the controller class. It then calls the
getReferenceidmethod to obtain the reference ID for the payment. -
User Data Initialization: An empty array
userDatais initialized, which will be populated later. -
Redirection: Depending on whether the current user is a student or not, the code determines the redirection route. If the user is not a student, they are redirected to the "Admin.Dashboards" route; otherwise, they are redirected to "MyDashboards."
-
Session Data Retrieval: The method attempts to retrieve previously stored payment initiation details from the user's session. It extracts the
userFormDetailandpaymentGateWayConfigfrom the stored data. -
Session Data Clearing: The code clears certain session variables, including "paymentInitiate" and "referer_module."
-
Reference ID Check: If a reference ID is obtained, the code proceeds to search for a payment record in the database based on the reference ID. If a payment with that reference ID is found, the payment data is extracted.
-
Payment Gateway Response Processing: The payment gateway response is processed by calling the
processResponsemethod from the payment gateway controller. The method is provided with the request, post data, and payment data. The response is obtained and checked for validity. -
Payment Status Update: If the response is valid, the payment status and related information are updated based on the response data. The exact fields updated depend on the payment gateway being used.
-
Notification and Redirection: Notifications are sent to the user, informing them of the payment status. The user is then redirected to the appropriate dashboard based on the payment status.
-
Email Notifications: The code also prepares and sends email notifications to the user, including details about the payment, the course, and the application type.
-
Discount Handling: If a discount code was used in the payment, the code updates the discount details.
-
Final Redirection: The user is redirected to the appropriate dashboard.
-
Error Handling: If the reference ID is not found or the response is invalid, error messages are generated and the user is redirected to an error page or receives an HTTP 401 error response.
In summary, the response method is responsible for handling and processing responses from payment gateways. It includes tasks such as updating payment status, sending notifications, and performing redirection based on the outcome of the payment processing. The method plays a crucial role in handling and confirming successful payments within your Laravel application.
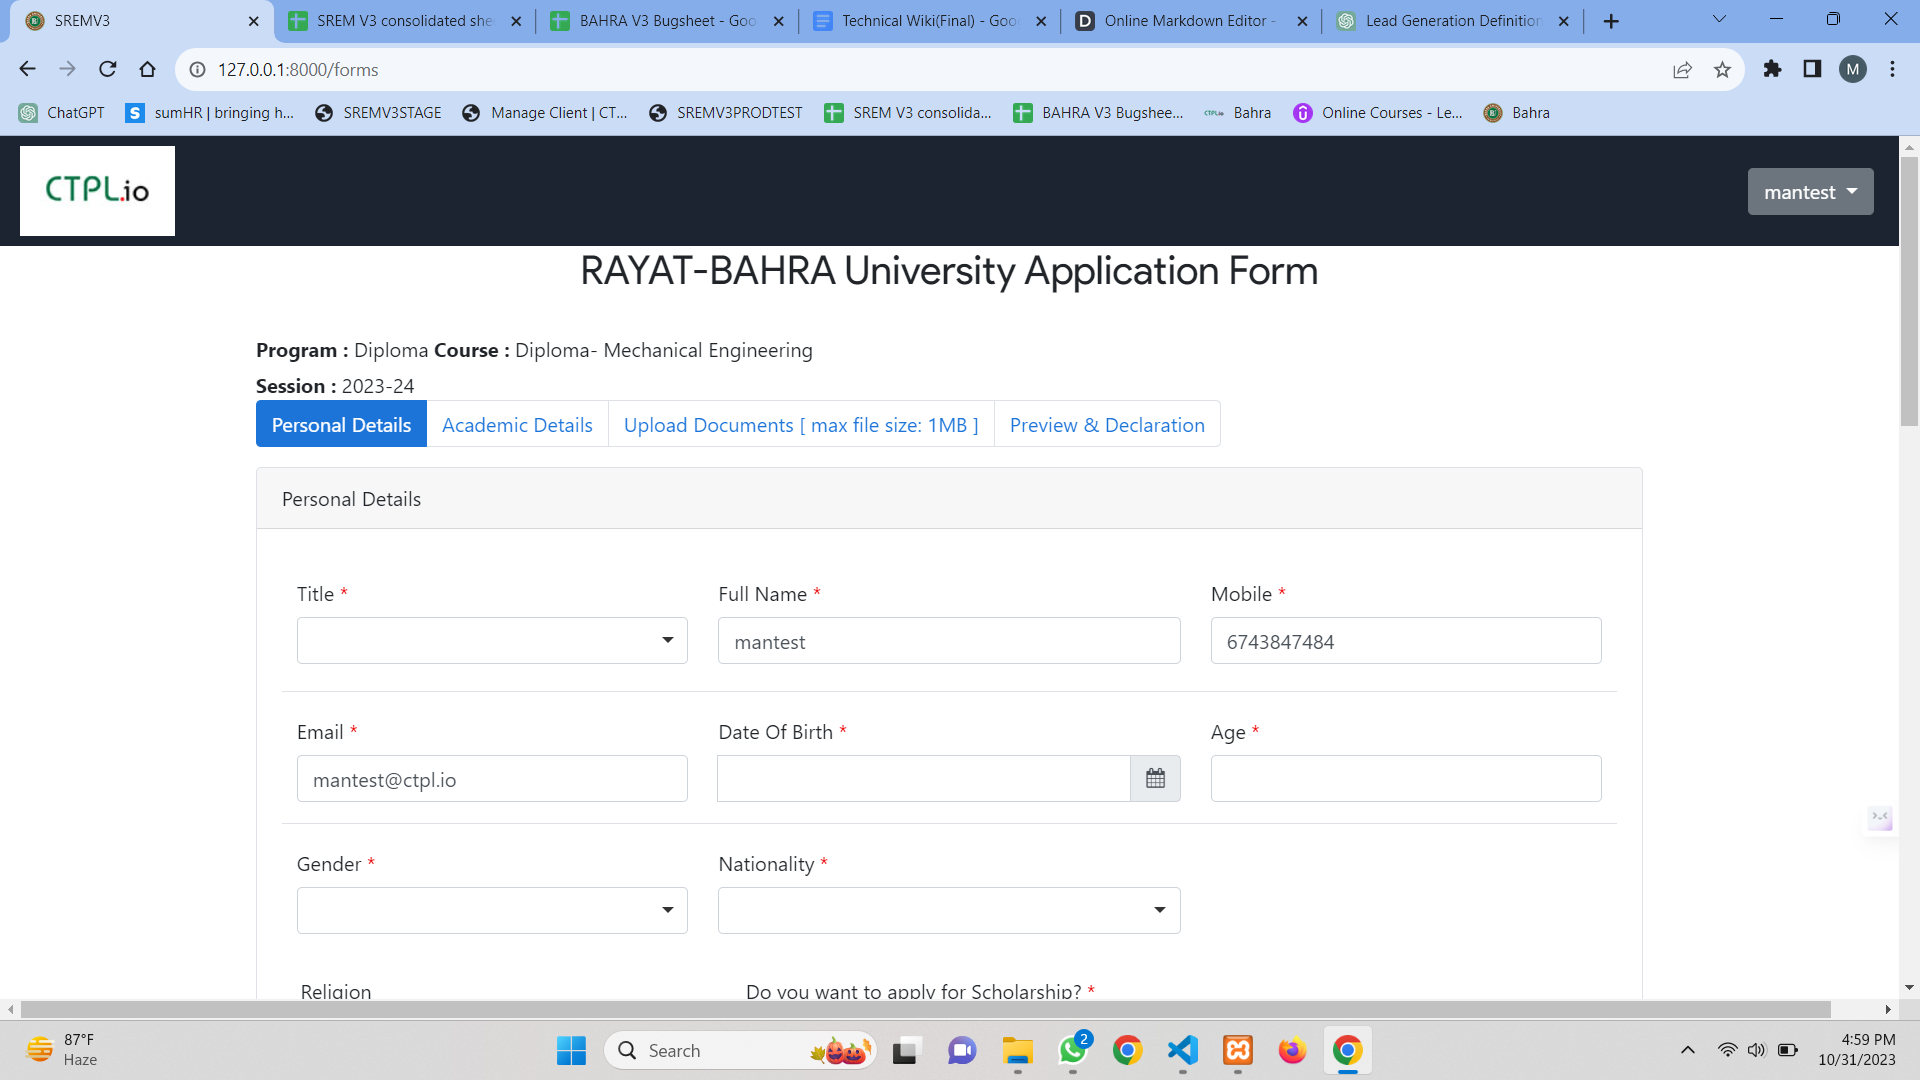
FormController@index
When a user is redirected to a form after payment or registration, and this redirection is controlled by your application's specific requirements, the user typically lands on a route associated with a specific URL, and that URL is mapped to a particular controller method, often referred to as the FormController in your application.
The FormController is responsible for handling various operations related to forms, such as displaying forms, processing form submissions, and managing form-related logic. Depending on your application's design, this controller might have different methods to handle various form-related tasks.
The index method is part of a Laravel controller and is responsible for handling the display and redirection of a form based on certain conditions. Let's break down what this method is doing:
-
Session Data: The method starts by checking if there is any data stored in the session under the key
'newRegistration'. This data may have been set during a previous registration process or interaction with the application. -
Request and User: It retrieves the current user and other request data. It also initializes some variables to store program and course information, user form ID, payment type, and session data.
-
Program and Course Information: The method checks if program and course IDs are present in the request. If they are, it suggests that the user is coming from a form-fill process. If not, it looks into the session data to find these IDs.
-
Program Session: It retrieves the session for the program based on the program ID. This session information might be used in the form display.
-
Redirection Logic: Depending on the source of the request (form-fill or registration) and program/course information, the method determines where to redirect the user. The possible redirection values are "payment" and "Intermediate."
-
User Form Check: It checks if a user form associated with the current user, program, and course already exists. If it does, the user form ID is stored in the session.
-
Payment Handling: If the redirection value is "payment," it checks if the user has already made a payment for the user form. If the payment has been made, it fetches the form data. If not, it may create a user form if it doesn't exist and set the payment type in the session before redirecting to the payment page.
-
Form Display: If the redirection value is "Intermediate" or it's neither "payment" nor "Intermediate," the method retrieves form data for display. It also fetches any media data required for the form.
-
View Rendering: Finally, the method renders a view, passing in the necessary data for form display, including form data, media data, and program session information.
The method is to handle the flow of displaying a form to the user, ensuring that the user is redirected to the appropriate step based on their interaction with the application, payment status, and previous form submissions. It takes into account whether the user is coming from a registration process or a form-filling process.